

One of my favorite projects as of late is a memory box (or some call it an exploding box). There are just SOOOOO many ways you can take this and make it your own.
One of my bestie's lost her mom last year, and we just passed the 1 year anniversary of her passing. I wanted to give her something and this is what I came up with. I just wanted something simple and elegant

I used SCAL to weld the words together and then cut them out of cricut vinyl. The swirl is from the objects library in SCAL too.


Materials
The basic bones of this album is only 4 12x12 sheets of cardstock + embellishments as you desire.
- 4 Sheets of `12x12 cardstock (the thicker the card the sturdier the box)
- Paper trimmer or craft knife and metal ruler
- bone folder
- Adhesive
- Pretties...
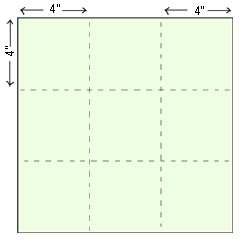
The box1. Take your 3 sheets of cardstock and trim them to size as per below:
|
2. Now score 4 folds on each card layer as per the measurements and diagram below.
|
 |
3. Cut out the corners from all 3 sheets. They should look like this when they are layered on top of each other. |
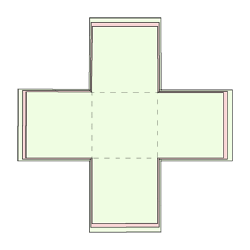 |
4. Embellish each of the four side panels on all three sheets as you wish. You may embellish both sides of each panel or just the top sides. Create pockets for tags, photo matts, use quotes, ribbon, brads etc. Adhere the bases together when you have finished embellishing the box. |
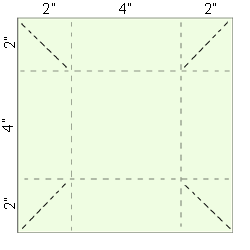
The Lid.Trim a the last piece of cardstock for the lid to 8"x8". Score folds similar to the first sheet above at 2" from each side. Do not cut the corner squares at this stage. Score four more diagonal folds as marked in the diagram below. Fold each corner up and adhere to the side to form the lid. Embellish as desired. |
 |
0 comments:
Post a Comment