CLICK HERE FOR FREE BLOGGER TEMPLATES, LINK BUTTONS AND MORE! »

Search This Blog

Tuesday, August 9, 2011

Charger Plate

These are super cheap and when decorated properly, make excellent presents. As you can tell, I'm getting my Christmas started a little early.


I cut this using white cricut vinyl, using my Sure Cuts A Lot. I do love that little machine!!
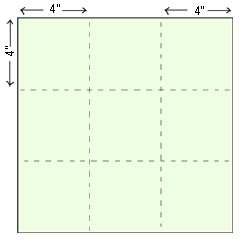
Saturday, June 18, 2011

Cupcake Bouquet


Not bad for a first attempt....

Wednesday, June 15, 2011

Dinosaur Fun with Adams Acres

My nephew had his 4yo birthday last week, and these little dinosaurs were just perfect to use for party favors.

Super easy to cut.


and really adorable!!


The files are available at Die Cut Designers.

Tuesday, June 7, 2011

Now I know why I never throw anything away

So my DH has been gently nagging me to clean up my craft space. We are on opposite ends of the clean spectrum, and sometimes my version of cleaned up, does not match with his. :-) I was going through all my paper, when I came across a bunch of colorful scraps. I hate throwing scrap pieces of paper away. It makes me batty, because I know as soon as I throw it away, I will have a project where I need it. Sound familiar to anyone?

I have been looking online for different ways to make paper flowers when I came across THIS tutorial. Simple and easy, and the arrangement looked great. I will admit that I cheated a bit though. I took his picture he uses to demonstrate the folds, and uploaded it into SCAL. Perfect cutting template.

What you need:
Paper Scraps at least 3x3 size
Glue
Flower wire or pipe cleaners

This is what I came up with. I think I may bling them up a little with some glitter dust later today, but I think they're super cute. Perfect gift for teachers, grandparents etc.


Saturday, June 4, 2011

Spilt Letter Tile

I have been dying to try one of these out ever since I saw one on the SVG Cuts Forum. They looked terribly complicated, but looks are deceiving.

What you need:

12x12 Laminate Tile (I got mine from Lowe's for about $1.00)
Vinyl
Cricut or some kind of cutting machine
Transfer tape
A decorative font
SCAL
Hot Glue Gun
Ribbon

So first you open SCAL, and choose your font. I used Regal. It already has the leaves and swirly stuff built in. Choose your letter and size it appropriately. Be sure you align it in the center of the page, using your H-Align and V-Align.


Next, go to your shapes library and choose a horizontal rectangle. Then uncheck the proportions box on the right, so that you can size it the way you want. Drag the rectangle to about the middle of your letter, and then you can size it all the way across.


Then up at the top, you go to Edit, then Select all so that everything is highlighted. Now everything on your page should be selected. Then at the top select Path, then Back Minus Front.


Voila! You have a split letter.


Now, we have to make the space a little wider for the names in the middle. Right click on your letter and select Break Apart. Draw a box around each section of the letter, then right click and select Group. This will allow you to select your top and bottom sections and move them separately. You want to be sure you use the Nudge indicators on the top right. This will allow you to move the sections up and down directly, so everything stays lined up.


Now move each section until you have enough room in the center. Then add the names you want to use. My friend Suza is getting married, so I thought this would make a neat wedding present..


You're ready to cut. Be sure you adjust your machine settings to do a "kiss cut". That way you can cut through the vinyl, but not the backing. It makes life easier when it comes to the weeding and transfer tape part. Weed out the excess vinyl, and apply your transfer tape. Be sure you smooth the tape down well so everything sticks well. Then carefully line up your letter on your tile. Press the transfer tape down, being sure to get the edges. Remove your transfer tape and TA-DA! You have a split letter tile. I hot glued a ribbon to the corners so that it could be hung up.


Wednesday, June 1, 2011

Coasters

This is another project that I was super excited about how it turned out. It's super simple, and turned into a great gift.

What you need:
4 plain bathroom tiles
4 pictures
 (I used brochure paper to print them on. Made them sturdier)
Mod Podge
Foam Paint Brush
Spray Sealant

Be sure you size your photos so they fit on the tiles. These tiles are 4x4. Paint a thin layer of Mod Podge on the tile, then lay your picture on it. Mod Podge dries super quick, so be sure to be as accurate as possible with the picture. It can be kind of difficult to adjust it. Once your picture has adhered, cover the whole thing with another coat of Mod Podge, then let it dry. Repeat. I usually do at least 3 coats. Then once all your tiles are completely dry, spray them with the sealant. It gives them a nice glossy look, and helps to make them water proof.  VOILA! A great gift for any occassion!


Ray's Word Book

So a dear friend of the family celebrated his 80th birthday this year, and I've been dying to try out a word book. So, I thought, here goes nothing.

I used a tutorial from mycricutscrapbooking, which you can get to by clicking on the link. Very easy to follow. All you need is some paper, bling or pretties, Inkscape, and SCAL.


I love this picture. Ray is the most conservative guy I know. The bucket on his head is just greatness!


I welded the word family together using SCAL.


and

Tuesday, May 31, 2011

Crazy May....

WHEW! I am so glad to get back to my happy little blog world. This stretch of May is a beast in our family. Birthdays, weddings, anniversaries, and graduations galore.

So a few months back, I bought the Cricut Cake Mini and at first I hated it. Well let me rephrase, I hated having to figure out how to make the actual edible substences work with the machine. As much I hate to admit it, I'm way more kitchen/cooking fail then anything else, but I was determined.

Then I stumbled onto a brilliant product, Wilton Sugar Sheets. These little babies cut amazingly, but the only down side is the $4.00 per sheet price. That's actually a little less then the cricut cake sheets, AND since it's wilton, you can use the discount coupons on them. So $$$ worries solved! I use SCAL or my Gypsy when putting together a design, so I don't waste, then any that you don't use can be sealed back in its package to be used later. It's rather genius.

Here are what I have done so far with them...


Caleb's 3rd Birthday Cake


For my little brother who loves the Rangers


Tuesday, May 10, 2011

Memory Box

One of my favorite projects as of late is a memory box (or some call it an exploding box). There are just SOOOOO many ways you can take this and make it your own.


One of my bestie's lost her mom last year, and we just passed the 1 year anniversary of her passing. I wanted to give her something and this is what I came up with. I just wanted something simple and elegant


I used SCAL to weld the words together and then cut them out of cricut vinyl. The swirl is from the objects library in SCAL too.


Materials

The basic bones of this album is only 4 12x12 sheets of cardstock + embellishments as you desire.
  • 4 Sheets of `12x12 cardstock (the thicker the card the sturdier the box)
  • Paper trimmer or craft knife and metal ruler
  • bone folder
  • Adhesive
  • Pretties...

The box

1. Take your 3 sheets of cardstock and trim them to size as per below:
  • Bottom layer (box) - 12" x 12" (thick card stock like bazzill linens are preferable for strenth)
  • 2nd layer - 11" x 11" (Ok to use patterned scrapbook cardstock for these 2 layers)
  • 3rd layer - 10" x 10"
2. Now score 4 folds on each card layer as per the measurements and diagram below.
  • Score the Bottom Layer 4" in from the sides
  • Score the 2nd layer 3 ¾" in from the sides
  • Score the 3rd layer 3 ½" in from the sides
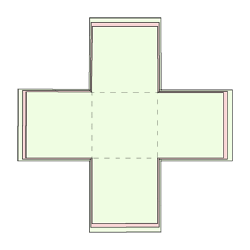
3. Cut out the corners from all 3 sheets. They should look like this when they are layered on top of each other.
4. Embellish each of the four side panels on all three sheets as you wish. You may embellish both sides of each panel or just the top sides. Create pockets for tags, photo matts, use quotes, ribbon, brads etc. Adhere the bases together when you have finished embellishing the box.
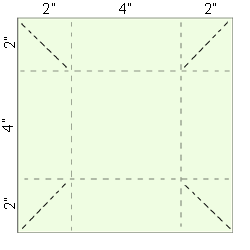
The Lid.

Trim a the last piece of cardstock for the lid to 8"x8". Score folds similar to the first sheet above at 2" from each side. Do not cut the corner squares at this stage.
Score four more diagonal folds as marked in the diagram below. Fold each corner up and adhere to the side to form the lid. Embellish as desired.
explosion box album lid


Monday, May 9, 2011

Mother's Day Frame

So I don't know about you other mothers, but my little boy LOVES LOVES LOVES his grandmother. She keeps him for us while we work, and I'm pretty sure Caleb (my son) thinks the sun rises and sets with her.

As such, I wanted to make her something special for mother's day, so this is what I came up with.


The cut files are from SVGCuts.com and can be found below.

I made a couple changes to the frame though. The top layer has another little swirl that comes out right into the middle of the oval, and it was obsuring my sons face. So I just cut it out with a pair or scissors. I also created another layer for the back using SCAL. I needed some way to attach the pipe cleaner so it wouldn't show through the back. So in SCAL, I took both layers of the frame and placed them on top of each other. Then I selected them both. Then on the right hand side in your tool panel, under appearances, you can change the style. I changed it from Normal (which is the default) to Shadow Blackout. This will give you a background for both layers, but notice it is still in 2 pieces. Select both pieces, then up at the top click on path. Then slide down to union, and VOILA! A background for the entire frame.

For the humming bird, he comes in a few pieces. So be sure to import them all into the dame page in SCAL. Then you can select all, and size to suit. That way you can be sure all your pieces layer correctly. The eye of the hummingbird was a really tiny circle, so I just used a white gel pen instead.

Hope everyone was able to enjoy their mother's day!


Tuesday, May 3, 2011

welcome!

Welcome!

So I get very inspired by those crafty women all around the web, and decided I needed to become one of them. I love all kinds of crafts, and decided to share that love with you!